Expert Advisor Strategy Design: Exit Techniques

In this Expert Advisor Strategy Design article learn how to build accurate exit techniques and set-up trailing stops, stop loss and take profit orders with an EA.
“Every battle is won before it is even fought...”
-Sun Tzu, The Art of War
Up to this point we have been testing our trend following MACross strategies with an exit that is the reverse of the entry position:
Often this is the most simple and straightforward way to design and test a good system. You know your entry mechanism is that more robust if can serve as a good exit as well. Most trend-following strategies benefit from being in the market all the time, reversing with each signal. Moreover, we always have to be on guard against overoptimization, and one of the ways to avoid its risk is to keep the strategy as simple as possible – without too much unnecessary accumulation and hybridization of indicators, signals, entry and exit techniques. The opposite signal as exit approach is one way to keep the strategy simple and less prone to curve-fitting.
However, there are various reasons to use an exit rule rather than just a reverse of position. First, you might want to scalp the market with a profit target. Second, there are times when you want the strategy to be flat, rather than long or short, such as exiting when the price closes below a short moving average and still above a long moving average. Third, if you are writing a strategy based on several indicators that must be in agreement, you might want to exit on one or two of them, waiting for all of them to be in agreement before entering again.
Exits other than opposite signal as exit are more appropriate for breakout and countertrend strategies than for trend-following strategies. By their nature these strategies are short term – and need additional exits to get them out with profit before their particular situation runs its course. With trend-following strategies like the MACross, we must be sure that if the exit gets us out of the market we have a way of getting back in for the potential big move. Sometimes using an exit signal apart from the opposite close prevents a timely entry back into the market and the strategy misses the big move.
General Stops: Stop Loss, Take Profit, Trailing Stop, Trailing Profit, and Breakeven Stop
You should also experiment with all general types of exits: stop loss, take profit, trailing stop, trailing profit, and breakeven. All these forms of stops are usually calibrated in pips, dollars or percentages that are either fixed beforehand or changing dynamically according to the average true range (ATR). The optimization engine can certainly help you calibrate the right form and value to have as a stop loss and take profit. It can also help you determine the appropriate trailing stop and breakeven or none at all.
The rule for all general stops is that that they must not interfere with market action. If the stop loss is hit too soon on a corrective move, or the profit target / trailing stop is triggered before the move had travelled its full course, then you would be interfering with the way the strategy was designed to operate. It must be remembered that there are distinct advantages and disadvantages with using each type of stop – and you have to weigh each against the other in order to decide to use them or not.
The Stop Loss
The stop loss is the king of the stops because it is used to protect the capital against an adverse market move. A stop loss is the price at which at trader will sell a currency and take a loss on the trade. Perhaps the next entry would reverse positions before the stop loss is hit, but there are times when it does not – and you want to be sure to get out before losing too much on any one trade. In my opinion, if the strategy is not a grid or martingale, it can only benefit from having a stop loss.
The stop loss is often calculated in pips, and it helps one determine the maximal amount of money that you are willing to risk on any one trade. Suppose, for instance, that you do not want to lose any more than 2% of your account on any one trade, and your account size was $10,000. That means you would not want to lose any more than $200, and thus you would trade 0.1 lots with a stop loss of 200 pips.
While there are many advantages of using a stop loss, the disadvantage is that the stop price could be activated by a short-term fluctuation in currency price. The key is picking a stop-loss that allows the currency to fluctuate while limiting as much downside risk as possible.
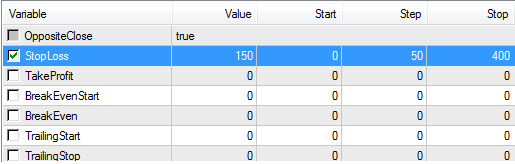
Often the best way to determine the size of the stop loss is through an optimization of it in relation to your strategy. In all my MACross experiments, I have always had a 150 pip stop loss because I had an educated guess that that such a stop loss would be the most appropriate for a trend-following strategy on a H4 timeframe. An educated guess is the best starting point, but you would have to see if it holds up to the test.
Let us take one of the best MACross strategy to date, the 25-250 SMACross (H4) and optimize the stop loss from 0 (no stop) to 500, in steps of 50, as you can see here:
The top results are here:
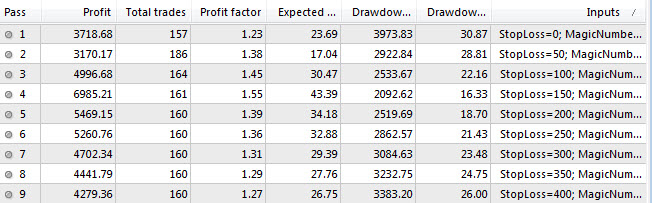
As you can see, the guess of 150 pip stop loss was the correct one. It gives the strategy just the right amount of breathing room to eeke out $7300. All the other stop loss results amount to half or one third the performance.
TakeProfit
A takeprofit is a straightforward way for a trader to set a price target at which their position will automatically be closed so the trader can take profit on a trade. The benefit to this is that it sets forward a rational approach to locking in profits.
The disadvantage of a profit target is that can take off the trade too early, before it has run its course, and you are thus missing out on potential profit. If you arbitrarily set a profit target number, then it will invariably mess up your strategy. The best way to determine the need and value of a profit target is through optimization.
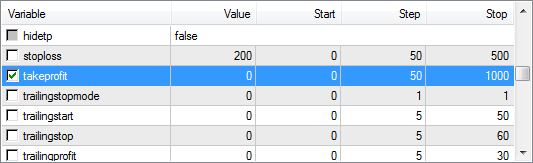
Let us take one of the best MACross strategies I had created to date, the 25-250 SMACross (H4) and optimize the profit targets from 0 (no stop) to 1000, in steps of 50:
The top 10 results are here:
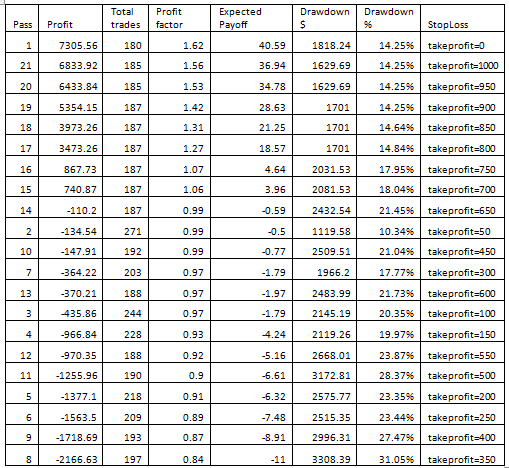
As you can see, having no TakeProfit (takeprofit=0) was the most significant optimization. Because it is a trend following strategy on the H4 timeframe, it must be given the freedom to capture the 1000+ pip moves, not noosed in by a premature profit target. In fact, it is interesting to note that all TakeProfits that are less than 600 pips result in negative performance. If the strategy depends so highly on the freedom of movement, as seen in this profit target optimization, it foreshadows that it will not take kindly to any form of premature alteration – such as trailing stop, trailing profit or breakeven.
Trailing Stops
The trailing stop is a stop that continuously adjusts itself n pips in the direction of the trade in order to help lock in profits. An ideal stop is one that allows enough “room to move” and hence allows the profits to run, and of course eventually gets you out when the trade turns against you.
Most standard trailing stops auto-adjust the trailing stop n pips for every x pips increase in price. This is very basic, and probably not so useful.
Funyoo’s template gives the trialing stop a major boost versatility wise. Here are the main variables one can manipulate regarding the trailing stop in the properties tab of the EA:
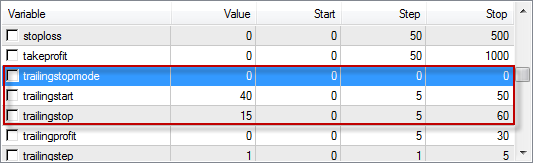
The code for Funyoo’s trailing stop has a number of different combinations to it, and it is useful to know at least five of them:
- Trailing mode=0, trailingstart=0, and trailing stop> 0
- Trailing mode=0, trailingstart>0, and trailingsto>0
- Trailing mode=1, stoploss=0, trailingstart=0 and trailing stop>0
- Trailing mode=1, stoploss=0, trailingstart>0, and trailingstop>0
- Trailing mode=1, stoploss>0, trailingstart>0, and trailingstop>0
We will briefly describe each one.
Combo #1: Let us say we have trailingmode=0, trailingstart=0, and trailingstop = 15. This will immediately make the stop loss to be 15 pips (from entry), no matter the original stop loss size. From there the stop loss will automatically increase (on long position) for every increase in price from entry. This is the common form of trailing stop – but one of the least effective.
Combo #2: Let us say we have trailingmode=0, trailingstart=40 and trailingstop=15. If market goes up 40, it protects 30 (40-15), and it will continuously increase from that point with the market. This combo is probably the most effective of the five.
Combo #3: Let us say we have trailingmode=1, stoploss=0 and trailingstop=15. This will immediately make the stop loss to be 15 pips from entry. From there the stop loss will automatically increase (on long position) every 15 pips increase in price from entry. The trailingstop thus acts as a step threshold with this combination, as opposed to the continuous increase of combo #1. The strategy will go to breakeven when position is 15 pips up, and protects 15 pips when position is 30 pips up, etc.
Combo #4: Let us say we have trailingmode=1, stoploss=0, trailingstart=40 and trailingstop=15. Here there is no change in price unless the market doubles its trailingstart size. If market goes up 80, it protects 40, and then every 15 pips additional, it protects 15 more pips.
Combo #5: Let us say we have trailingmode=1, stoploss = 100, trailingstart=40, and trailingstop=15. If market goes up 40, then it moves the original stop loss up by the value of the trailingstop, or 15 pips, so that the stoploss is now 85 instead of 100 (100-15). Every additional 15 pip increase, the stop is increased proportionally. Breakeven is hit after the market has moved the distance of the stoploss plus the trailingstart (100+40 = 140 pips). A fifteen pips profit is protected when the price has moved the distance of the stoploss plus trailingstart and trailingstop (100+40+15=155).
With the power of optimization, you can try all the combinations out.
After examining all the combinations, combo2 is perhaps the best. It has the classic profit threshold that must be reached prior to initiating the trailing stop. It is also the only one that preserves unchanged your original stoploss amount.
The idea behind the trailing stop is that it allows you to let profits run while at the same time guaranteeing at least some realized gain is made.
Often the disadvantage with the trailing stop is that, no matter which combination is selected, or how well optimized the variables, the trailingstop undermines the performance of most systems. Currencies generally have a wide trading range that makes the use of trailing stops problematic. The wide range and frequent micro contractions hit the trailing stops and prevent the strategy from running its full course. You will notice that the markets often retrace to the trailing stop, and then find second winds that move up to higher prices that your premature trailing stop prevented you from cashing in on. The best use of trailing stop is probably with a short term or scalping strategy.
For the medium term trend-following strategies like the MACross on H4 timeframe, every trailing stop combination undermines its performance.
Trailing Profits
The trailing profit is a reverse variation of the trailing stop. Most combinations of the trailingstop need the price to increase in value prior to initiating and moving the stop upwards. The trailingprofit, in contrast, needs the price to travel against the position – and it modifies the profit target lower for every pip interval the price has travelled south.
Funyoo’s template gives the trialing stop a major boost—versatility wise.
Here are the main variables one can manipulate regarding the trailing stop:
The code for Funyoo’s trailingprofit has a couple of combinations worth knowing about:
- Trailingstart=0 and trailingprofit> 0
- Trailingstart > 0 and trailingprofit > 0
Combo #1: Let us say we have trailingstart=0 and trailingprofit=15. This will immediately make the TakeProfit to be 15 pips (from entry), no matter the original TakeProfit. From there the takeprofit will automatically lower (on long position) for every decrease in price from entry.
Combo #2: Let us say we have a trailingstart=40 and trailingstart=15 on a long position. This means that if the market falls down 40 pips or more, then a continuously adjusted takeprofit of 15 is added to the market low. For instance, if you were long EURUSD at 1.2813, and it fell down to 1.2772 (or 40 pips), then a takeprofit would become active at 1.2787 (15 pips from low).
The trailingprofit is a very rare exit methodology, and it should be used with caution. I have seen it on scalping systems, and that is where it probably has more potential.
Be careful that you test the trailingstop and trailingprofit features on live demo accounts in addition to backtesting because the MT4 Strategy Tester has difficulty portraying the accuracy of a backtested system that depends on continuously updating stop losses or takeprofits.
Breakeven Stop
The breakeven stop kicks in at a predefined level and then shifts the stop loss to breakeven plus a variable pip amount such as 1. It functions with the intent to let your profits run while at the same time guaranteeing that at least you will not lose money on a reversal. The breakeven is seen as beneficial in the sense that if the market moved in your favor by x pips, then the stop will adjust to breakeven point and you will be trading on the risk of your profits only.
Here are the main variables one can manipulate regarding the breakeven stop:
The breakevengain represents the predetermined level you want to be in profit before the stoploss is shifted to breakeven. The breakeven variable allows you to indicate 0 for breakeven, or any other number, a positive number for breakeven + n pips in profit, and a negative number for breakeven – n pips of loss. I like that you are able to adjust this breakevengain AND breakeven amount because it allows you to play with more possibilities than just the simple breakevengain alone.
Because the breakeven stop is set a predetermined level and is not continuously adjusting its stop upwards like the trailing stop, it works better to give more breathing room to the trade. It serves to protect profits just like a trailing stop, but it does not get hit as frequently.
The problem with the breakeven is that if the breakevengain is set to low, your stop might get hit right away. Unless you are using a scalping strategy, I would make sure that the breakevengain is no less than 30. You should be prepared to optimize the breakeven variables for your particular strategy to see the right fit.
Nevertheless, no matter how well optimized the breakeven parameters are, there is a high probability that breakeven stop will detract from the performance of the strategy. Even though it is inherently better than the trailing stop in letting the strategy breath, in that it is static and not auto-adjusting, it still constricts the strategy. The wide range and frequent micro contracts can hit the breakeven stop and prevent the strategy from running its true course. You might think you are protecting your strategy when in fact you may be doing it more harm than good. The best use of a breakeven is with a short term or scalping strategy.
Dynamic Stops
An alternative way of determining the general stops is the dynamic stops set on the average true range (ATR). The ATR helps to determine the average size of the trading range. In other words, it indicates the volatility of the market and how much it moves from one point to another. It is dynamic because it gives different pip levels for each currency and timeframe – and these levels change with the volatility of the market.
Here are the main variables one can manipulate for the dynamic stops:

Atrdynamics=true is the way to activate the dynamic stops. The atrtimeframe is the timeframe of the ATR, and it is represented as a number such as 60 = H1. The atrperiod default is 14 because that is period Wilder had in mind when he discovered the ATR.
Whenever you want to activate the atrdynamics on a specific general stop, the factor of that stop must be greater than 0. For instance, if you wanted to activate the dynamic stop loss, you must indicate that slfactor=1 – and that would turn on the stop loss to be the ATR (14) of H1. If you indicated slfactor=2, you would be indicated you want the stoploss to be set at ATR (14) of H1 at a multiple of 2.
The factor (or multiple of the ATR) generally replaces all the pip values that we explored in relation to each of the general stops. The same potential benefits and cautions apply to all the general stops. The ATR dynamic version of them adds the extra benefit of these general stop levels to adjust automatically based on the particular range and volatility of the the currency and timeframe of the strategy.
If you want to activate the ATR dynamic stops as a a replacement of the Stoploss or TakeProfit, you must make sure that you properly calibrate the Stoplevel as well, for it is designed to indicate the minimal Stoploss and TakeProfit level. In the illustration above, I am setting up for optimization all three paramaters, the slfactor, the tpfactor, and the Stoplevel.
The dynamic ATR general stops have the unique ability to tailor the
general stops to the particularities of each currency’s range and
volatility, and so they should be optimized on your strategy to see if
they can be of any benefit or not.
Conclusion
Traders should always equip their strategies with a smart way of exiting.
The exit rule of the opposite close of the strategy’s own entry logic can often prove to be the best form of exit. It is simple and straightforward and less prone to overoptimization. However, other types of opposite closes of other indicators can be creatively experimented with so long as one is aware of the dangers inherent in cross-hybridization.
Whether fixed or dynamic, the general stop orders, such as stop loss, profit target, trailing stop, trailing profit, breakeven are simple tools yet many fail to use them at all, or use them properly. They can all help to prevent excessive losses or lock in profits, and most trading strategies can benefit from their use – particularly the stop loss. The stop loss should be seen as an insurance policy: you hope you never use it but it is good to know you have the protection should you need it.
It is all fine and good to want to protect your profit but it must also be remembered that a strategy needs room to breathe. The currency markets vacillate, and this vacillation can take out most protective stop mechanisms – such as the trailing stop or breakeven—before the trade had gotten underway. These use of these types of stops can be a double edged sword: we kick ourselves if we did not protect the potential profit before it reversed on us, but we would kick ourselves more if these protective profit stops short-circuit the trade before it has time to mature.
In the end, there are a huge range of possibilities to explore for exits and stops and it can take just as much work as it did for the setup to discover the right combinations. Just bear in mind that the simplest approach is often the best, and the more accumulation of exits and stops, the more vulnerable it is the dangers of profit-constriction and overoptimization.
 Copiar link
 Compartilhar no Facebook
 Compartilhar no X
 Compartilhar por e-mail